Deploying a three-tier architecture the Cloud way
Frontend, API and Database


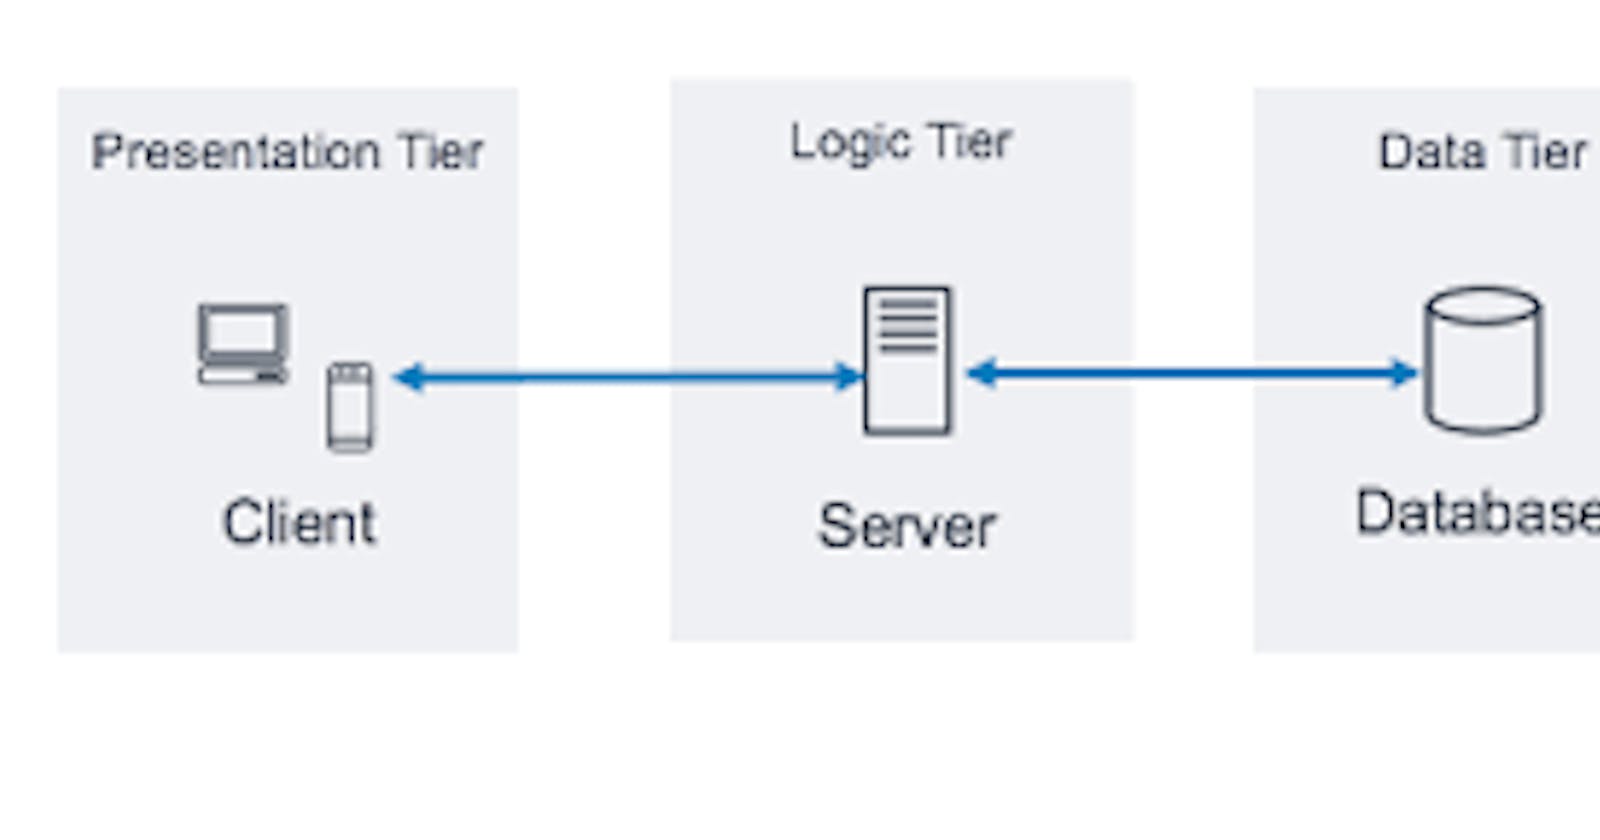
What is a three-tier architecture?
According to IBM,
Three-tier architecture is a well-established software application architecture that organizes applications into three logical and physical computing tiers: the presentation tier, or user interface; the application tier, where data is processed; and the data tier, where the data associated with the application is stored and managed.
The chief benefit of three-tier architecture is that because each tier runs on its own infrastructure, each tier can be developed simultaneously by a separate development team, and can be updated or scaled as needed without impacting the other tiers.
In this article, I will be writing about how to deploy an e-commerce three-tier open source application with ReactJS on the Storefront and Admin dashboard, Django on the Backend, PostgreSQL database and GraphQL API.
We will be using the following DevOps tools in the deployment:
- Docker and Docker compose for containerization
- GCP for Cloud Platform
Prerequisites
- A GCP account
- Ubuntu 18.04 or 20.04
- Have docker installed
The e-commerce application we will be using is an Open Source project that can be accessed with these URLS:
Local Deployment
First, we will deploy on localhost to see that our app works before we deploy using Kubernetes.
Docker and Docker-compose
This URL, Platform contains the entire e-commerce application with a YAML file that groups each tier of the application into it's own service.
version: '2'

services:
  api:
    ports:
      - 8000:8000
    build:
      context: ./saleor
      dockerfile: ./Dockerfile
      args:
        STATIC_URL: '/static/'
    restart: unless-stopped
    networks:
      - saleor-backend-tier
    depends_on:
      - db
      - redis
      - jaeger
    volumes:
      - ./saleor/saleor/:/app/saleor:Z
      - ./saleor/templates/:/app/templates:Z
      - ./saleor/tests/:/app/tests
      # shared volume between worker and api for media
      - saleor-media:/app/media
    command: python manage.py runserver 0.0.0.0:8000
    env_file: common.env
    environment:
      - JAEGER_AGENT_HOST=jaeger
      - STOREFRONT_URL=http://localhost:3000/
      - DASHBOARD_URL=http://localhost:9000/

  storefront:
    build:
      context: ./saleor-storefront
      dockerfile: ./Dockerfile.dev
    ports:
      - 3000:3000
    restart: unless-stopped
    volumes:
      - ./saleor-storefront/:/app:cached
      - /app/node_modules/
    command: npm start -- --host 0.0.0.0

  dashboard:
    build:
      context: ./saleor-dashboard
      dockerfile: ./Dockerfile.dev
    ports:
      - 9000:9000
    restart: unless-stopped
    volumes:
      - ./saleor-dashboard/:/app:cached
      - /app/node_modules/
    command: npm start -- --host 0.0.0.0

  db:
    image: library/postgres:11.1-alpine
    ports:
      - 5432:5432
    restart: unless-stopped
    networks:
      - saleor-backend-tier
    volumes:
      - saleor-db:/var/lib/postgresql/data
    environment:
      - POSTGRES_USER=saleor
      - POSTGRES_PASSWORD=saleor

  redis:
    image: library/redis:5.0-alpine
    ports:
      - 6379:6379
    restart: unless-stopped
    networks:
      - saleor-backend-tier
    volumes:
      - saleor-redis:/data

  worker:
    build:
      context: ./saleor
      dockerfile: ./Dockerfile
      args:
        STATIC_URL: '/static/'
    command: celery -A saleor --app=saleor.celeryconf:app worker --loglevel=info
    restart: unless-stopped
    networks:
      - saleor-backend-tier
    env_file: common.env
    depends_on:
      - redis
      - mailhog
    volumes:
      - ./saleor/saleor/:/app/saleor:Z,cached
      - ./saleor/templates/:/app/templates:Z,cached
      # shared volume between worker and api for media
      - saleor-media:/app/media
    environment:
      - EMAIL_URL=smtp://mailhog:1025

  jaeger:
    image: jaegertracing/all-in-one
    ports:
      - "5775:5775/udp"
      - "6831:6831/udp"
      - "6832:6832/udp"
      - "5778:5778"
      - "16686:16686"
      - "14268:14268"
      - "9411:9411"
    restart: unless-stopped
    networks:
      - saleor-backend-tier

  mailhog:
    image: mailhog/mailhog
    ports:
      - 1025:1025 # smtp server
      - 8025:8025 # web ui. Visit http://localhost:8025/ to check emails
    restart: unless-stopped
    networks:
      - saleor-backend-tier

volumes:
  saleor-db:
    driver: local
  saleor-redis:
    driver: local
  saleor-media:

networks:
  saleor-backend-tier:
    driver: bridge
In this article, I'll be focusing on the API (Django), Frontend (Admin dashboard and Storefront) and the Database (PostgreSQL) and I will explain the YAML file above by using each service as reference:
api:
    ports:
      - 8000:8000
    build:
      context: ./saleor
      dockerfile: ./Dockerfile
      args:
        STATIC_URL: '/static/'
    restart: unless-stopped
    networks:
      - saleor-backend-tier
    depends_on:
      - db
      - redis
      - jaeger
    volumes:
      - ./saleor/saleor/:/app/saleor:Z
      - ./saleor/templates/:/app/templates:Z
      - ./saleor/tests/:/app/tests
      # shared volume between worker and api for media
      - saleor-media:/app/media
    command: python manage.py runserver 0.0.0.0:8000
    env_file: common.env
    environment:
      - JAEGER_AGENT_HOST=jaeger
      - STOREFRONT_URL=http://localhost:3000/
      - DASHBOARD_URL=http://localhost:9000/
We have the api service which will expose the port 8000 on its container to port 8000 on the server where the host runs, build its image from the Dockerfile in the saleor folder, have its container in the saleor-backend-tier network and depends on other services like the database and redis before its image is built.
  storefront:
    build:
      context: ./saleor-storefront
      dockerfile: ./Dockerfile.dev
    ports:
      - 3000:3000
    restart: unless-stopped
    volumes:
      - ./saleor-storefront/:/app:cached
      - /app/node_modules/
    command: npm start -- --host 0.0.0.0
We also have the storefront service which will expose port 3000 on its container to port 3000 on the server where the host is running, builds its image from the Dockerfile.dev in the saleor-storefront folder. Docker volumes are important for caching such that when a change is made to the codebase, we do not have to build another image all over before we view the change. Hence, docker volumes enhance speed in deployment.
  dashboard:
    build:
      context: ./saleor-dashboard
      dockerfile: ./Dockerfile.dev
    ports:
      - 9000:9000
    restart: unless-stopped
    volumes:
      - ./saleor-dashboard/:/app:cached
      - /app/node_modules/
    command: npm start -- --host 0.0.0.0
We also have the dashboard service that builds its image from the Dockerfile.dev file in saleor-dashboard folder and exposes port 3000 on its container to port 3000 on the server where the host is running.
Setting up the application
It's time to set up the application by running the following commands in the terminal:
1.Clone the repository
git clone https://github.com/tomisinlalude/saleor-platform
2.Navigate to the repository
cd saleor-platform
3.Build the application
docker-compose build
4.Apply Django migrations:
docker-compose run --rm api python3 manage.py migrate
5.Collect static files:
docker-compose run --rm api python3 manage.py collectstatic --noinput
6.Populate the database with example data and create the admin user:
docker-compose run --rm api python3 manage.py populatedb --createsuperuser
7.Run the application:
docker-compose up
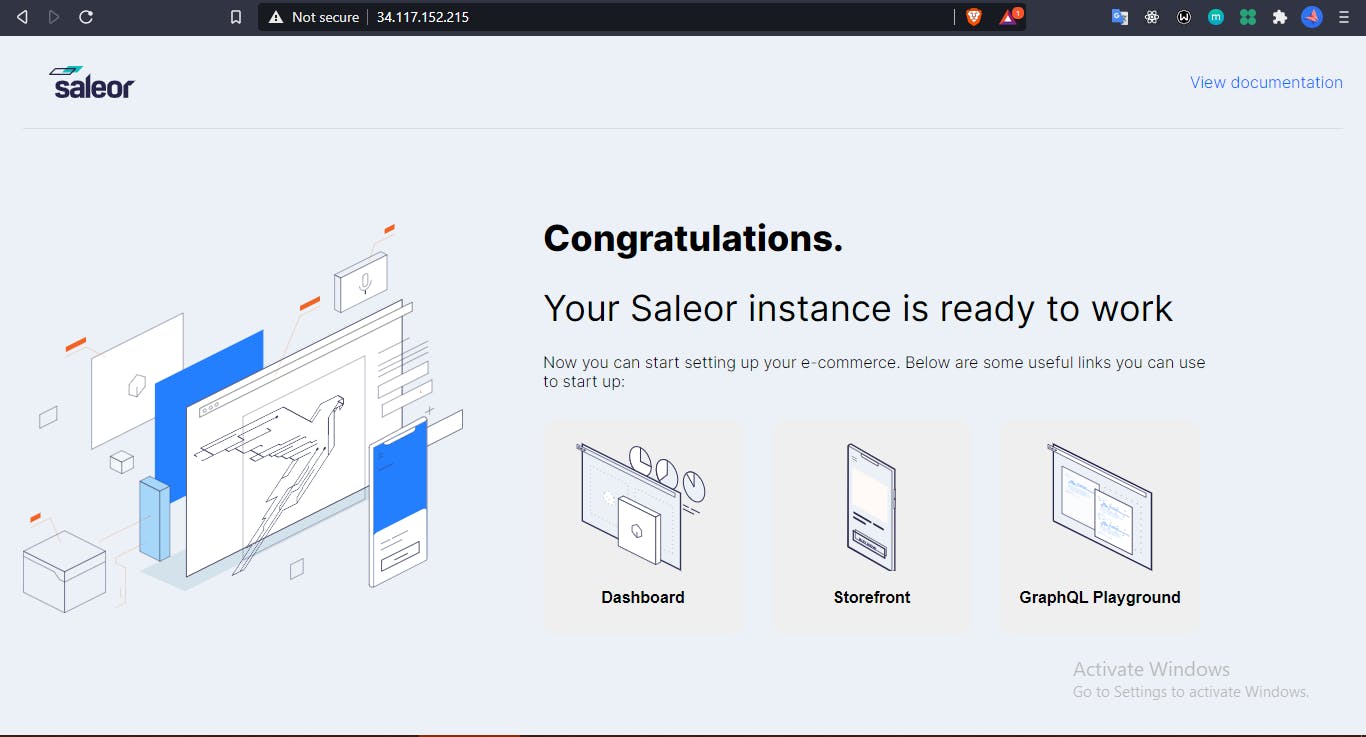
Now, our application should be up and running. Visit localhost:3000 to see the storefront, localhost:9000 to see the admin dashboard and localhost:8000 to view the API.
Deployment with Kubernetes and Google Cloud Platform
It's time to deploy our application live (to production) so it is accessible to the public and not just accessible in our local computer.
GCloud
Since we will be using GCP, the first thing is to install GCloud in the Ubuntu machine.
1.Add the Cloud SDK distribution URI as a package source:
echo "deb [signed-by=/usr/share/keyrings/cloud.google.gpg] https://packages.cloud.google.com/apt cloud-sdk main" | sudo tee -a /etc/apt/sources.list.d/google-cloud-sdk.list
2.Make sure you have apt-transport-https installed:
sudo apt-get install apt-transport-https ca-certificates gnupg
3.Update and install the Cloud SDK:
sudo apt-get update && sudo apt-get install google-cloud-sdk
Docker Tip: If installing the Cloud SDK inside a Docker image, use a single RUN step instead:
RUN echo "deb [signed-by=/usr/share/keyrings/cloud.google.gpg] http://packages.cloud.google.com/apt cloud-sdk main" | tee -a /etc/apt/sources.list.d/google-cloud-sdk.list && curl https://packages.cloud.google.com/apt/doc/apt-key.gpg | apt-key --keyring /usr/share/keyrings/cloud.google.gpg add - && apt-get update -y && apt-get install google-cloud-sdk -y
Install kubectl with gcloud
gcloud components install kubectl
Login to gcloud
gcloud auth login
Create a Kubernetes Cluster in GCP
Login to your GCP account. In the search bar, search for Kubernetes engine.
Click 'Clusters' and then 'Create'.
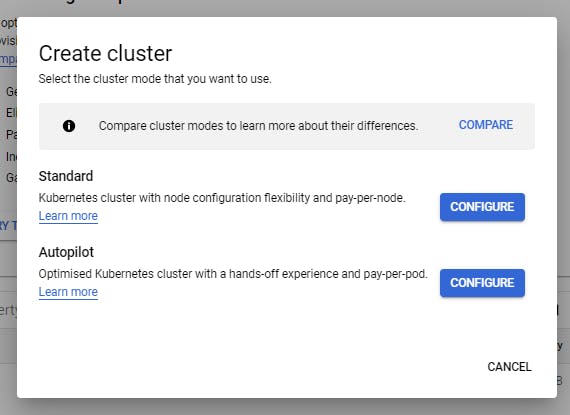
Click 'Configure' on Autopilot mode Like you'll read while creating your cluster, in the Autopilot mode, all you need to do is deploy your application and GKE will take care of the nodes, networking, security and telemetry.
You can edit the name of the cluster to whatever you choose, leave the other configurations as they are and click 'Create'.
What is Kubernetes?
It will be a good thing to understand the definition of Kubernetes before we go much further.
Kubernetes, also known as K8s, is an open-source orchestration system for automating deployment, scaling, and management of containerized applications in production.
It groups containers that make up an application into logical units for easy management and discovery.
Also, according to this website,
“Kubernetes, or k8s, is an open source platform that automates Linux container operations. It eliminates many of the manual processes involved in deploying and scaling containerized applications,” Haff and Henry write. “In other words, you can cluster together groups of hosts running Linux containers, and Kubernetes helps you easily and efficiently manage those clusters.”
- Next thing is to connect the cluster we just created to the application
gcloud container clusters get-credentials saleor --zone europe-west1-c --project generated-media-310804
PS: I named my cluster, saleor.
Clone these three repositories:
In each of these repositories/services, we will do the following:
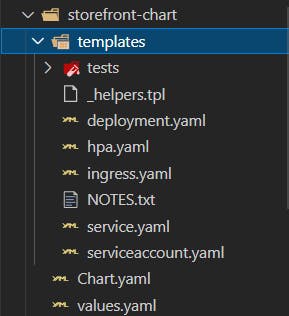
- Generating the kubernetes files using helm chart
helm create <chart-folder-name>
Helm Charts are simply Kubernetes YAML manifests combined into a single package that can be advertised to your Kubernetes clusters. Once packaged, installing a Helm Chart into your cluster is as easy as running a single helm install, which really simplifies the deployment of containerized applications.
Charts allow you to version your manifest files too, just like we do with Node.js or any other package. This lets you install specific chart versions, which means keeping specific configurations for your infrastructure in the form of code.
Helm also keeps a release history of all deployed charts, so you can go back to a previous release if something went wrong.
Helm supports Kubernetes natively, which means you don't have to write any complex syntax files or anything to start using Helm. Just drop your template files into a new chart and you're good to go.
But why should we use it? Managing application manifests can be easily done with a few combinations of commands.
Assuming I am currently working on the API service, I can have:
helm create api-chart
This creates a folder in the repository, named storefront-chart and this is what the folder structure looks like:
- Update the YAML files to suit the project
This folder is created with many default configurations. So you need to customize the files to suit your application. Check my repository to see the changes I made to values.yml and templates/ingress.yml.
- Install the objects
helm install saleor-api ./api-chart/
where saleor-api is the name of the helm chart itself.
- Upgrade the chart in the cluster when changes are made
helm upgrade saleor-api ./saleor-chart/
- Create IP address in cluster
gcloud compute addresses create saleor-api --global Get the IP address created from Ingress
kubectl get ingressVisit this IP address in your browser
Repeat these processes for the other services (storefront and Admin Dashboard) and visit the IP address (created by Ingress) in your browser.
You can also map this IP address to a DNS. My DNS is saleor-api.oluwatomisin.xyz
Conclusion
All the processes involved in this deployment are manual. Usually, some of these processes can be automated with Bash scripts, the infrastructure managed with Terraform/Ansible, Continuous Integration and Continuous Deployment automated with Jenkins or CircleCI etc.
I hope this article helps you understand (more) about Containerization and Container Orchestration.
Thank you for reading.
Cheers!